

STEP ONE: MAC Paint Pot Rubenesque all over lid, apply with fingers.

Paint Pots are kind of like cream shadows, but they dry to a shimmery, creaseless finish. They are a good alternative to primer. Since my look will be a bit warmer, I enlisted the help of Rubenesque instead of my usual Etude House Proof 10 or Benefit Lemon Aid as my peachy gold base.
STEP TWO: bareMinerals Ready 2.0 The Scenic Route (white) in the center of the lid, apply with MAC 239.

The lighter shade from one of my favorite eyeshadow duos, Breathtaking, is described as a “golden snowflake” color. It registers white but has a beautiful golden sheen when applied to the skin. I’m looking for a nice gradation so I patted a bit of this lighter shade onto the center of my lid. It’s a bit less orange than Rubenesque.
STEP THREE: bareMinerals Ready 2.0 The Scenic Route (green) in the outer corner—apply with Marionnaud Pointy Brush—and crease—apply with MAC 217.

The other half of The Scenic Route, Spectacular, is a subdued olive, army green that is also a bit shimmery. I applied this on the outer ‘v’ of my eye with a pointed shadow brush from Marionnaud. It’s a good cheap alternative to other more expensive brands. Next, I applied a bit of the shadow to the outer crease with my fluffy blending brush from MAC (217).
STEP FOUR: MAC Amber Lights in the inner corner of eye, apply with Marionnaud Pointy Brush.

To add a bit of warmth, I added MAC Amber Lights to the inner corner of my eye. I now look like a flag!
STEP FIVE: MAC Amber Lights, line upper and lower lash line, apply with MAC 239.

With the same eyeshadow shade, line both upper and lower lash lines. Blend out the lower lash line with a fluffy brush.
STEP SIX: Maybelline Black Gel Liner, apply with any liner brush.

Because the orange liner seemed to wash out the effect of my entire eye, I decided to line the upper lash line and my lower water line with a black gel liner.
STEP SEVEN: Majolica Majorca Lash Expander Frame Plus 12, no need to curl.

Apply mascara! Mine is pretty volumizing and lengthening so I didn’t see the need for curling my lashes. Then, I fixed my brows by filling it in with a light brown shade.
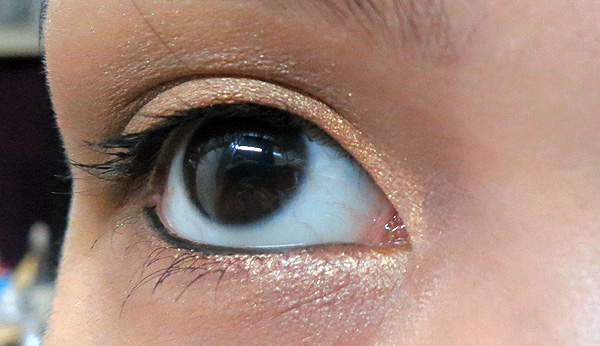
Finished Eye Look!

Yay! That wasn’t so bad. 🙂 The whole process takes about 10 minutes, once you’ve got the routine down pat. I think it’s a nice everyday, glow-y look, if you’re tired of using browns.
A picture of the arsenal for your reference. Maybe you have something similar to these products:


The brushes I used: MAC 239 (flat eye brush), MAC 217 (blending brush), Marionnaud No. 37 (pointy eye brush), the Maybelline brush my gel liner came with.
To see the list of products used for the entire look, check this post.
Hope that helped!

Such a pretty look for fall, I love how soft and warm it looks!
Thank you so much 🙂
A gorgeous look! I love these shades 🙂
Thank you! 🙂
I really like your eye looks.
Thank you so much. 🙂