All posts filed under: Tips & Tricks

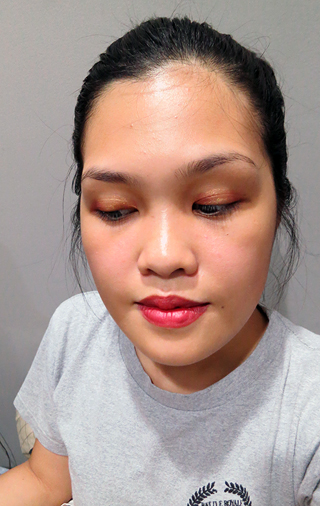
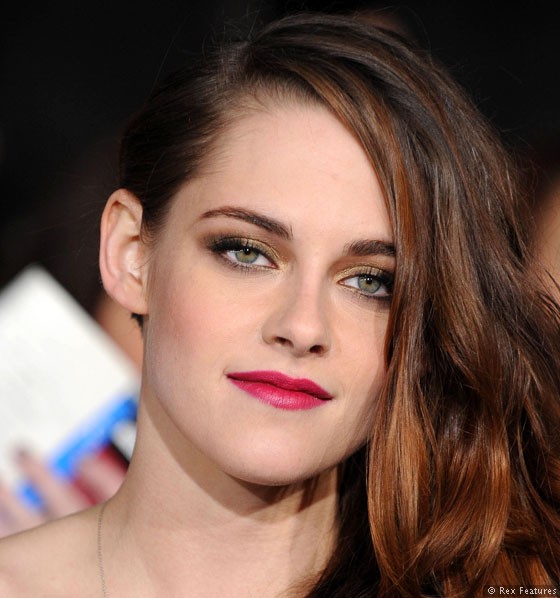
Make That Face: Inspired by Kstew’s Red Carpet Look for the Breaking Dawn: Part 2 Premiere in LA

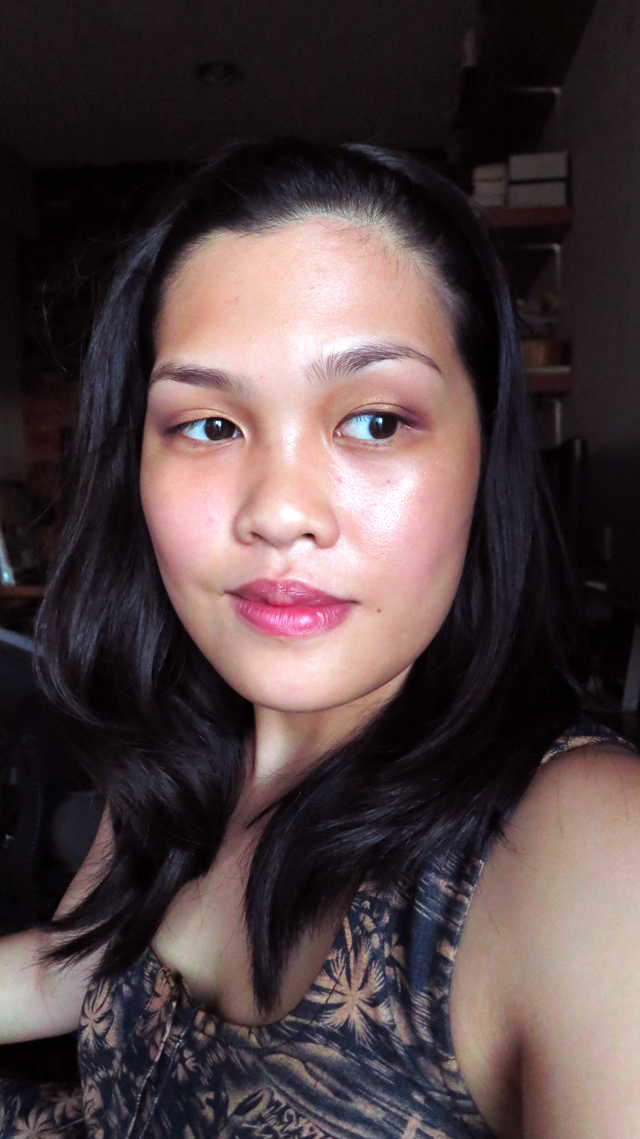
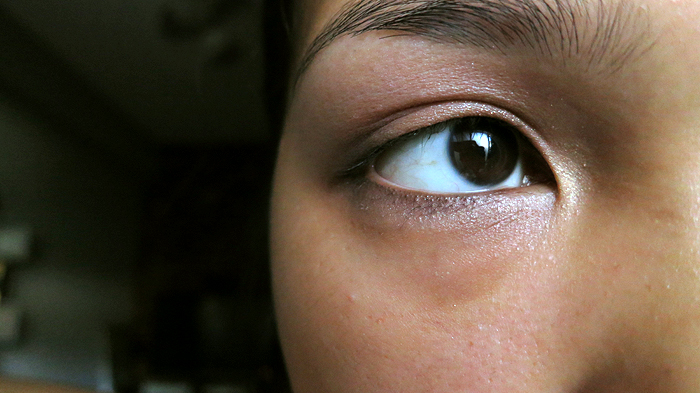
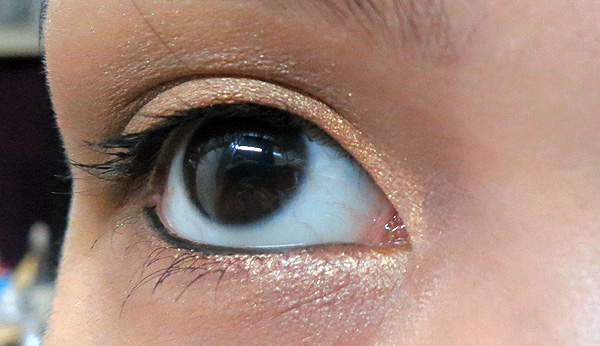
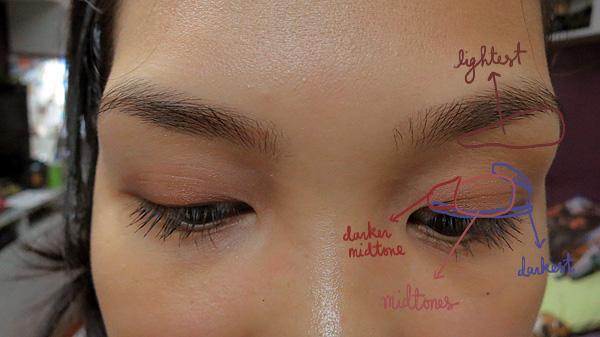
My sister asked me recreate this look months ago but I’ve only gotten around to it now. Kristen Stewart wore this face to the LA premiere of Breaking Dawn: Part 2, and my sister loved it to bits. Now, obviously, I am not that good at eyeshadows yet but I decided to give it a shot anyway since it looks like it could be a great holiday look. Here’s what I came up with: What do you think? 🙂 I sadly don’t have a step-by-step as I did this “on the fly.” I’ll explain the “procedure” here, but if you want a picture of the products I used, scroll down. Apply BB Cream all over the face, going over the eyelids. Use the darker shade of The Body Shop’s Brow & Liner Kit (02) and fill in the brows. I filled mine in more than I usually do. Use a clean spoolie to groom your brows. Pat on MAC Paint Pot (Rubenesque) all over the lid until just below the crease. Use a caramel brown …

Makeup Starter Kit

So, my friend Kat asked if I had a post on makeup products for people who are just starting out with makeup, and I thought, “Hey! That’s a cool idea,” so now here it is. Personally, my transition from buying n00b-friendly (that’s newbie-friendly to you!) products to more upscale and high-end ones wasn’t a long time… I was an obsessive beauty blog trawler before I became an obsessive makeup purchaser, but I think that’s OK because my decisions have been fairly educated thus far. Now, onto the post! I made a video for this, but of course I have a text-only breakdown of the products for those who don’t want to watch a video. I tried to make it fairly, short though. It’s just under 4 minutes. 🙂 I tried to just use drugstore brands and mid-range brands, because it’s a little nuts to buy high-end products if you’re just starting out and exploring options. However, I stand by my belief that you should always pick the best products for your face—especially when it comes …

Holiday Looks: Good Ol’ Red & Gold

I wore this look one day while on vacation in Italy. I had only brought a NARS eyeshadow trio to use for a month (AH!) so when we came across cheap Italian brand, Kiko Milano, I wore a look that’s almost entirely made up of the products I had picked up in Venice. Featured are the Eyetech Look (automatic eyeshadow) in 03 Oro, or gold, and the Water Eyeshadow in 203 Borgogna, or Burgundy, a combination which pretty much screams “Holiday Look!” to me. Both eye products were bought on the cheap (especially cheap in Italy), but the quality is pretty good. On the cheeks is NARS Orgasm, aka the only blush I brought with me, and on the lips: another KIKO product, the Shiny Pearl Lipstick in 193 Beige Nudo. For this post, I decided to recreate the look and post the same eye with a different lip, more suited for holiday festivities. 🙂 Pardon the haphazardly way this look was “recreated.” By the time I had done enough work for me to not …

Holiday Looks: Everyday Plum

Here’s a super-quick holiday look that’s been my go-to lately. It’s a great alternative for the deep reds and golds we usually see people put on for the holidays since it features an array of plummy goodness and just a hint of a pretty golden glow. Excuse my face. Like I said earlier, I’ve stopped wearing foundation etc, so all you’ll see today are the color (eyes, cheeks, lips) themselves. 🙂 Prepare for pores! I wanted to do a plum-based look that played with golds, so I did my eye in those colors, and picked a subtle plum lip shade. I paired it with a peachy-pink blush with a bit of golden shimmer, instead of my favorite plummy blush, NARS Sin, because I felt like bringing it to the cheeks might be a bit overkill. I wanted also a glow and a light flush, instead of heavy pigmentation. Eyes: MAC Paint Pot (Rubenesque), bareMinerals A Vision in Velvet Mineral Eyeshadow (Satin Plum and Velvet Vanilla), Shu Uemura x Karl Lagerfeld Painting Liner (Blackish Satin Purple), …

Make That Face: Basic Neutral (Shimmery) Eye

Okay, so every time I feel stress creeping up on me, I turn to my beauty blog and think of something that I can post. You know, to de-stress and to avail of its strangely therapeutic effects. (Have you tried blogging? It’s very relaxing.) I thought of doing a step-by-step tutorial, just because I want to practice and also because you guys seem to like that! I noticed that a lot of people shy away from eye makeup, aside from the standard eyeliner and mascara, but you don’t have to be afraid anymore. Really, it’s one of the funnest parts of my routine. So, here’s an eyelook that I did, using only colors from theBalm’s Nude ‘Tude Palette, the brush it comes along with, as well as the eyeshadow brush from the RealTechniques Travel Essentials Set, which I just love so much. Because I wanted to play with the palette moreso than I usually did, I ended up using seven shades (I forgot to box Snobby!), most of which weren’t what I had been using …

Make That Face: A Tutorial for a Warm & Colorful Neutral Eye

STEP ONE: MAC Paint Pot Rubenesque all over lid, apply with fingers. Paint Pots are kind of like cream shadows, but they dry to a shimmery, creaseless finish. They are a good alternative to primer. Since my look will be a bit warmer, I enlisted the help of Rubenesque instead of my usual Etude House Proof 10 or Benefit Lemon Aid as my peachy gold base. STEP TWO: bareMinerals Ready 2.0 The Scenic Route (white) in the center of the lid, apply with MAC 239. The lighter shade from one of my favorite eyeshadow duos, Breathtaking, is described as a “golden snowflake” color. It registers white but has a beautiful golden sheen when applied to the skin. I’m looking for a nice gradation so I patted a bit of this lighter shade onto the center of my lid. It’s a bit less orange than Rubenesque. STEP THREE: bareMinerals Ready 2.0 The Scenic Route (green) in the outer corner—apply with Marionnaud Pointy Brush—and crease—apply with MAC 217. The other half of The Scenic Route, Spectacular, is …

EOTD: Something Out of Nothing

Here is today’s EOTD featuring the Avon True Color Quad in Sandy Corals (reviewed here) and my new favorite weapon, Majolica Majorca Lash Expander Frame Plus 12! I have practically no relationship with mascara, because I never understood how to use it. Every time I tried one on, my lashes would look the same and I’d end up with black brush imprints on my lid or under eye area. I never knew I wanted lusher lashes until now! Luckily, my mom had an extra bottle because of a sale purchase a few months ago. So now, I have my own. 🙂 It’s got a two-sided applicator, one side a comb and the other a coil. I haven’t used it all that much to master application, though. There’s a slight blue-grey tinge to it that I don’t mind and actually enjoy quite a bit. It’s also a fibre-based formula, which has fibres that stick to your lashes, helping to elongate them. At first, I thought they were hairs from my mom’s lashes! Here’s my whole FOTD, …