

I used to teach part-time, and I find that it makes more sense to talk about history first. However, I haven’t exactly finished writing that post. Heh.
So, for this day of this September Special, I wanted to share a basic “eye diagram” to sort of help you follow tutorials if you find them a little hard to do. I’m also going to post about my go-to technique for eyeshadow application, which was what I basically used when I was still exploring eye makeup. I just used to interchange the colors. 🙂
BASIC EYE DIAGRAM
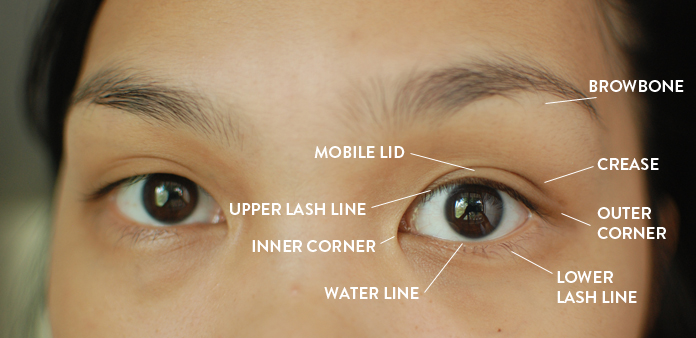
Obviously, there may be some differences with how each person refers to these “parts” of the eye, but this is how I usually follow tutorials and explain eye makeup to people.
— Brow bone: protrusion just under your eyebrow. Usually enhanced by a light eyeshadow.
— Mobile lid: part of the eyelid that “moves” when you blink. The part under your crease.
— Crease: the fold of the eye.
— Upper lash line: where your eyelashes grow on the upper lid.
— Lower lash line: where your eyelashes grow on the lower lid.
— Inner corner: corner of the eye nearest your nose. Usually enhanced by a light shadow to brighten up the eyes.
— Outer corner: corner of the eye farthest from your nose. Usually enhanced by a dark shadow to add depth to the eyes.
— Waterline: sensitive fleshy part of the eye lids that “water.” Usually lined with kohls or eyeliners to enlarge or shrink appearance of eyes.
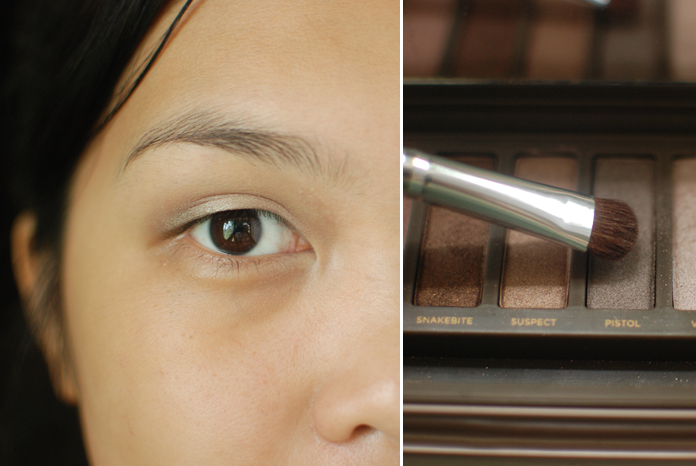
Now, on to my technique! This is fairly easy and usually requires just 2-3 shadows. For the sake of variety and ease, I’m using the Urban Decay Naked 2 Palette for this demonstration:

In general, I am a fan of palettes because you get way more bang for your buck and the process of color selection has been done for you. You just have to figure out where to put which color. 🙂
MY GO-TO EYESHADOW TECHNIQUE
1. Prime your eyes. I remember the first time I heard of eye primers, I hunted one down immediately. These help keep your eyeshadow in place and crease-free.
2. Take a flat shader brush and apply a light shadow all over your mobile eye lid. I used Verve for this look.
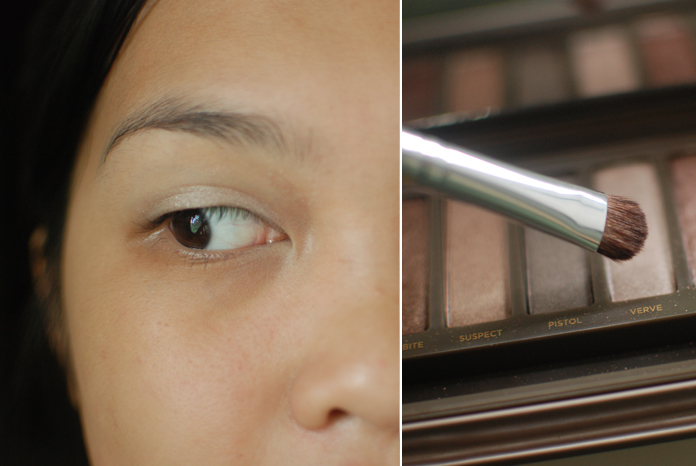
3. Take a blending brush and apply a midtone shadow onto your crease. I used Tease for this look.
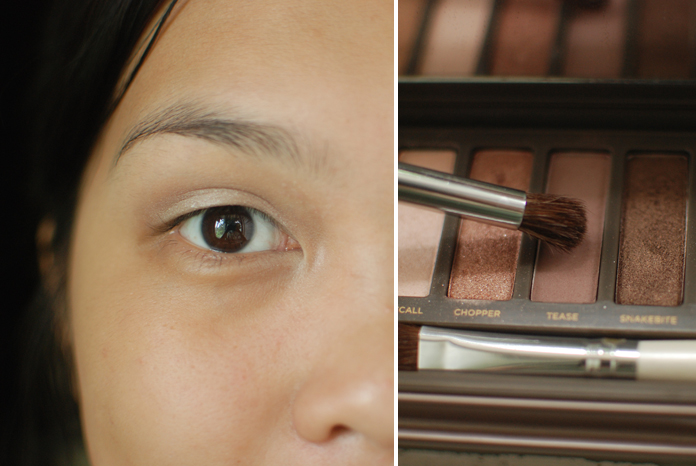
You can use any midtone to dark eyeshadow, but it’s been said that it’s better to use a matte shade to really deepen the crease. A shimmery shadow may cause light to reflect off of your crease, so while the shade is dark, there is still a light-reflecting effect that pulls the shadow forward.
4. With the same flat shader brush, select a dark shadow and add it on the outer corner of your eye. Blend out with a blending brush. For this look, I used Pistol.
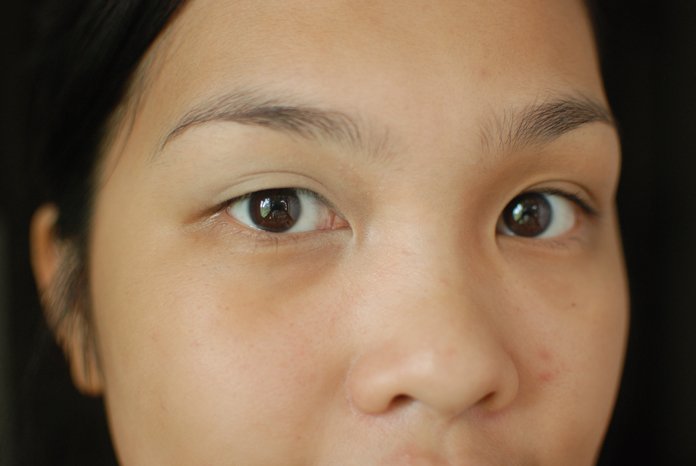
And that’s it! I decided to use mostly the same technique on my other eye to show you that this can be used in many different ways, just by interchanging the color, according to tone.
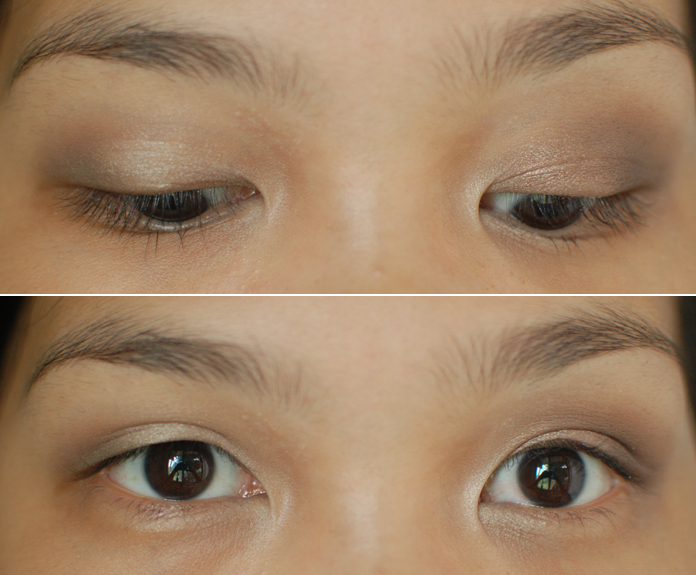
For the look on my other eye, I added a matte highlight on my brow bone (Foxy), and a light shimmery highlight on my inner corner (Bootycall), but I stuck to the rest of the technique. YDK for the inner 2/3, Busted for the outer third, and a super blended out Snakebite for the crease, upward.
Can you imagine all the fun and the possibilities? 🙂
Anyway, I hope this was helpful! Stay tuned for tomorrow’s post. Thank you for reading!
You can keep track of updates on Facebook or my Twitter. I don’t post a lot of beauty stuff on my Instagram, but if you want to see, you can find it here!

Love this! I have an idea of what the term for each part is, but your descriptions made it 100% clear which one is which. Is it strange that I kept blinking while reading the description of the mobile lid? 😛
Yay, I’m so glad, Pat. 🙂 Not at all strange! I’d do the same haha
Love this! 🙂 I still struggle with eyeshadow application. I usually don’t have time to practice during the week but would really want to experiment during weekends.
Yay, thanks Jin! How’s “The Truth” working out for you pala? I’ve been tempted many many times to actually just buy it haha.
It’s a great quad and you’re right about the texture of the shadows – soooo buttery. 🙂 I can’t maximize it though because a) my technique still sucks (how do I stop looking like a raccoon!), b) I’ve yet to buy a good primer for my oily lids. I’m considering getting a MAC paint pot! I thought of getting a primer primer but I was reading up on the paint pots & Bobbi Brown’s long wear cream shadows which act as primer + a nice wash of color. 🙂
Haven’t tried Bobbi Brown, but I can vouch for the formula of MAC and Benefit. 🙂
Thanks for this post! This is very helpful and easy to follow! I love it! 🙂
I’m so happy to hear that. 🙂 Hope to see some photos if you decide to attempt it!
Don’t have much to say, except THANK YOU! 🙂
Welcome! 🙂
The colors are great! Perfect day look 🙂
Thanks 🙂
Serious envy here about your awesome pictures.. super clear explanation!
This is the way I do my eyes too hihi! Extending the crease as needed. I always use a dark matte shade for the crease but didn’t realize why it looked better as such until you explained it. 😉
Yay! 🙂 I think it’s the easiest, most logical way. Haha. That’s just my way of understanding it, but makes sense no?
Luv this. thank you 🙂
Thanks for the comment. Glad it helped you out. 🙂
This was a great post! Learning to put on eyeshadow isn’t as intuitive as everyone seems to think, especially when it comes to all the different parts of the eye. I can’t tell you how many times I’ve had to google all the different terminology when I am trying to write a post. lol.
Yay, thanks Sam! 🙂 LOL, I agree! It takes a while before it becomes fun because you’re always just stuck with muddy eyes after the first few attempts!
lol. I remember always allotting like 15 extra minutes if I was going to get adventurous with my eye makeup before I got more experienced with it. I remember many times having to wipe it all of and start again – especially when I would use darker shadows.
This post actually inspired me (the too lazy for eyeshadow person) to pick up my brushes and play with my palettes again. 🙂 Thank you!
Aw, that’s awesome! Would love to see the results hehe 🙂
Pingback: September’s Softly Special: All About the Eyes (Master List of Posts) | Softly Sometimes
Such an awesome, helpful post! I’m a lipstick kind of girl because I don’t know which eyeshadow shade should go to which area of my eye haha. I always feel like I’m making such a huge mess but you make it look easy! Will definitely try your technique. 🙂
I’m glad! Hope it works out for you. 🙂